November 16 - Annual Red Dragon Open House and Trunk Sale. Noon to 6:00pm
December 7 & 8 - Red Butte Garden Holiday Open House and Art Fair 10:00am to 5:00pm both days

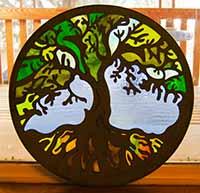
That was the request, and this is the original piece of art:

It had a "lip" in the back that would be perfect to act as a frame to support the glass so I said I'd be happy to give it a try, and brought it home with me.
I had a vision of how the final piece would look so all I had to do was make that vision become a reality.
I wanted to make it as interesting as possible so each area would be a different color of glass. Trees aren't just one shade of green and light affects how you see a tree based on the density of the leaves; The earth is rich with varied shades and colors too.

Once I was happy with the design I drew the final pattern and had 2 copies made

Normally I'd have a color plan sketched out and know exactly what color each piece was going to be. This time was much more intuitive and I let the piece tell me how to proceed. I was choosing glass from my shelves, some colors made the final cut and some didn't.


After each piece is cut and fitted to the pattern, I wrap it with copper foil and solder it in place. All of the excess flux is cleaned off and I allow it to dry.

Even though the soldering lines won't be visible when this piece is hung I am going to patina the solder to give it a finished look - the back will be visible and I want it to look professional.

There is still one problem - how to anchor it into a frame that wasn't really meant to be a frame? What I consider a glass artist's best friend, Silicone! I used brown silicone in a caulking gun and ran a generous bead around the entire frame. After 24 hours it is ancored solidly into the metal frame and ready to hang.
